DIY coin purse with a "kiss clasp"
 Here is a personalized, inexpensive project. I made five of these coin purses for my five nieces. Here's how to do it yourself, and what I would do differently next time.
These are two tutorials which were quite helpful. They don't agree on how to set the fabric into the frame.
Molly's sketchbook: a cute Japanese coinepurse
Purse frames de-mystified (aka Laundry Day clutch purse) - tutorial: they say "have you ever wondered how to make those lovely purses with clasp frames; dented, scratched, and ruined a metal frame/frames with those darn pliers; taken apart lots of purses to try to figure how in the heck they put them together...well step this way because we can help."
 I ordered my purse frames from Ah Kwok Buckles in Hong Kong. They sell a lot of really cool stuff.
 The price was reasonable, even with shipping. They came in quantities of five. I got five square ones and five curved ones.
Since then I've heard about this place: American Purse Supplies. Haven't tried them. (Haven't used up all my frames from last time.)

 So, first draw yourself a pattern, as roomy or long as you like, as long as the top edge conforms to the pattern given by the manufacturer. If you use square frames, the very top is flat, but you can angle the sides out as much as you want.
 The pictures in the links I gave above are wonderful. Go have a look.
I made the template the size of the finished purse and did not include seam allowance - I added the seam allowance later.
Once you've drawn your purse, tape the drawing onto a piece of cardboard for a template (I always use cereal boxes).
 Trace your template onto lightweight fusible interfacing, four times for each coin purse you are making - then iron the interfacing pieces onto the fabric and use them as a guide for cutting out the fabric pieces. Since I was making five change purses, I cut out twenty identical pieces of interfacing. I ironed ten of them onto my lining fabric and cut around them, this time adding a seam allowance.
  Then I ironed five more pieces of interfacing to the five different "outside' fabrics I was using. The last five pieces of interfacing will eventually be ironed onto your "outside' fabric, but not yet.
Now trace your pattern (leaving room for the two seam allowances) onto the front fabric. I used very narrow grosgrain ribbon for the letters and stitched it onto the fabric by hand with tiny stitches. Some other system might be better.


Stuff a lining bag inside each "outside fabric" bag such that the seams show on the outside and the seams show on the inside.
Think of the unsewed perimeter as a mouth - start sewing at the front teeth and sew right around the side to the bottom teeth and keep going around ALMOST back to where you came from, but leave a gap to pull the purse through. And then pull the fabric through. There should be no raw edges showing anywhere, and there's a little unsewed bit at the top of one of the sides, but since you're about to glue it into the frame it will never show.
 Elmer's Ultimate Glue with Precision Tip was what was recommended to me. I love this glue. It expands, like gorilla glue, only it's more manageable. Expanding is good in this case because the fabric is thin and the channel is thick.
 One method of making purses suggests stuffing a string up inside the frame. Good luck with that. I carefully prodded the fabric up into the channel hard against the glue and it worked ok - but if I do this again, I'll try cutting a piece of cardboard the shape of the channel and shoving that up in there with the fabric, or maybe I'll baste a piece of yarn to the mouth of the purse before I turn it right-side out.
Let the glue dry before you close the purses. Here are three of the five purses I made, as they sit with the glue drying.
One tutorial said to use pliers and gently crimp the purse frame closed. I complied, because it bothered me that the fabric was thin and the metal channel was wide, but it kind of wrecked the purses. Next time, instead of crimping, I will add cardboard inside the frame. Otherwise, I'm very pleased with how the purses came out.

by melinama @ 9:50 AM
1 comments
![]()
![]()


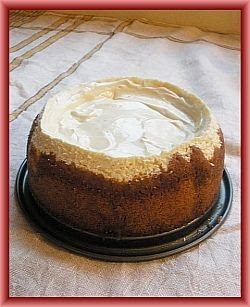 I didn't find a recipe online for what I wanted - a half-sized cheesecake - so I figured it out for myself and it was perfect.
  After I made two half-size cheesecakes in a 1-quart baking dish, I splurged and bought a 7" springform pan. A 6" pan would also work, you would have to cook it a little longer at a little lower heat.
 12 ounces of cream cheese (that's one and a half of the big size or three of the small size) you can use non-fat creamcheese and it will turn out fine!


 In May I got an email from Jane Filer, a wonderful local artist who I took a studio class from long ago, inviting me to an unusual event:
 When I arrived, they helped me move my gear into a giant vacant building next to the Arts Council. There were already lots of people with their easels set up, painting or schmoozing. I had decided to use this time as a retreat to practice the piano so I set up way, way back in the back of the building where there was an electric outlet.
 This is the block of historic downtown Elizabeth City that was our headquarters, with the art council and the studio next door. I put on my headphones and practiced silently most of the time, but it was great to be around other happy people doing what made their hearts sing. I would say "artists" here was a self-diagnosed condition - there were paintings and creations from the sublime to the ridiculous - which actually added to the easy-going atmosphere.
 ... and to bid on painted chairs, proceeds to the local arts. Here you see them loaded up on the way to the Peels' house: the shrimp boil was held at the home of the mayor and his wife, Joe and Carolyn Peel. They also amazingly let me stay at their wonderful house which is full of folk art and right across the street from the huge, beautiful river. Look:


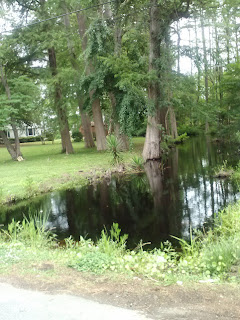


 Like most small North Carolina towns, Elizabeth City is trying to figure out how to thrive in the 21st century. Its primary advantage, and it's a huge one, is the beautiful confluence of rivers. The coastline where all these rivers come together is almost a fractal, and it seems like everybody who has a home along the river has a pier and a lovely view. But the rest of the county is really suffering. I hope the current efforts to find economic possibilities for the area are successful. And I look forward to going back to Elizabeth City for the next artists retreat.


 A few of my daughter
Melina's great posts:
A few of my daughter
Melina's great posts: