[Hannah]: Let's talk about dressmaking
So, it's my first week after the end of school. It's a period of transition that always results in a little bit of anxiety for me - all that nervous energy that I had been using to write papers has no place to go. When I was in college I would always be home at my parents' house and would soothe myself by playing Civilization III on the computer until 3 or 4 AM the first night I was home. Then I was usually okay.
This year, my transitional project was dressmaking. I bought a used sewing machine from the excellent Berkeley Sewing and Vacuum Center. I bought some cheap gingham fabric online (the Companionable Atheist is fond of gingham).
I decided to make my own pattern. I traced onto tracing paper the six-gored skirt from a double-layered cotton dress from Ann Taylor I know looked good on me. I can't find it now but the skirt is kind of shaped like this.
So I had the pattern for the skirt. The top I kind of invented. So here are the patterns (from left to right): top part (needs 2), waistband, one of the skirt pieces, of which there were six. (wide ones for the front and back, narrower ones for the sides):

It was a fun geometrical puzzle to try to figure out how to sew the pieces together so that all the raw edges ended up on the inside. I woke up at 6 AM a couple days in a row with my brain happily working on this problem and refusing to let me go back to sleep. I sewed gathers into each side of the top that were parallel to the line of the top. It turns out this is a very forgiving method to give yourself space for your boobs. Unlike halter dresses - it turns out those are actually kind of tricky to gather correctly. Even though the double-layer cotton I was using was stiff, it worked out great. I had no boob problems with this dress. Oh, and I also used iron
on interfacing in the waistband to give it a little more structure. In the end we had something like this:

Now this design ended up having two major problems. First, I had forgotten to make the width of the top of the skirt identical to the width of the top of the waistband. The top of the skirt was from a dress that fit me, and the waistband I had measured on my very own waist, so it kind of didn't occur to me it would be a problem. It was! I had to go and tighten all the skirt sections, I had to narrow each one of them so that the skirt would remain symmetrical. That was annoying, and kind of changed the line of the skirt, but it was simple to execute in the end.

Problem number two: the zipper. Somehow I had not noticed that my skirt pattern assumed the zipper would be in the center of the back, while my top pattern assumed it would be a zipper under the arm. I had left seam allowances in two different places. Crap! I decided to go with the underarm zipper ... further damaging the symmetricality of the pattern. This wouldn't have been a problem except fabric with a check pattern reveals EVERY uneven-ness. My waistband was particularly uneven looking, since it was wider at the top than at the bottom. See below.

Well, it turns out I didn't take a picture of the truly problematic parts of it, I guess cause I was annoyed.

Not bad! Here's another angle, you still can't really tell.

But trust me, trouble was a-brewing under that right armpit. The zipper was weirdly lined up and it just looked ridiculous. So I ripped it apart and did a whole nother top and waistband, learning from my mistakes. I did the waistband so that it was diagonal-oriented and that way its unevenness was concealed.

Hey hey, not bad! The white cotton liner turned out to make a cute looking edge to the fabric. The top is secure enough that there won't be any wardrobe malfunctions. In spite of last minute fudging, the skirt is reasonably flattering. I still need to hem it and wrestle a little more with the zipper (this time it's in the back). But really, I think it looks nice. The only way I would change this pattern for next time is to give myself a little more room in the waistband where I didn't give myself much seam allowance - The "invisible zipper" I bought is awful finicky and after an Indian dinner it took quite a bit of work from the Companionable Atheist to zip me into this dress. Suck it in, Scarlett.
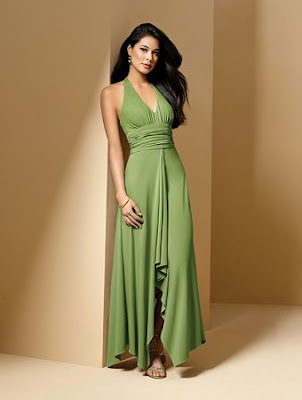
Final conclusion: the pattern is a smashing success and I am sure I will make it again. Not sure this is really the style I want for a wedding dress though (I was imagining cotton under-layer again, with lace top layer). I thought it was, but now I think it would be a little plain! Back to the hunt... I really want to make something like this Tadashi dress, but I think sewing with chiffon would be a nightmare:

Or like this, but in what fabric?

Or like this? Without the dumb sash, I think this is wicked foxy.


 A few of my daughter
Melina's great posts:


6 Comments:
I absolutely LOVE all your dress models and they look perfect for you. as for fabric, experiment. as for your current experiment, congratulations, it looks great! You need a helper, it's very very hard to fix things like this by yourself! That's why people make clothing dummies of themselves - or get their mommies to help.
I like that last lace dress...I agree it is wicked foxy, but then I love lace.My older daughter got married last September. She wore a very plain , inexpensive gown in ivory crepe from the J. Crew catalog , and everyone wanted to know where she bought it. However, a big smile makes any dress the perfect one. Good luck on finding or making the perfect gown for your big day.
What a great project. Melinama is right. It might be helpful to have a dressform and you can make one easily with duct tape:
http://www.leanna.com/DuctTapeDouble/
Then you can drape on the dressform.
Your model gowns are nice but if they are made of stretchy fabric, you are going to have a problem. You need a special sewing machine to sew stretchy fabric but a nice soft draping silk will be fabulous.
I am impressed by your self-drafted dress. My personality type (ISTJ on the Myers-Briggs scale) demands that I have a pattern already, alter it extensively to fit my sloper, volumes of sewing instruction books that I can follow. As I was reading your step-by-step process, my brain was in "Ack! Ack! Ack!" mode. (LOL) I am in awe of your talent.
BTW, you do not need a special machine to sew knits. What really does help is a "walking foot" a/k/a even feed foot, and a ballpoint or jersey type needle, and sew the seam with a slight zig-zag stitch. Go to patternreview.com, you'll have to "join" to read the message boards, but you can 'search' them, and find all sorts of great info on sewing knit fabrics.
Forgot to say,,,, some of those bridal dress web sites have some truly wonderfully slutty looking outfits, too. They caused a few raised eyebrows and hoots of laughter. Our son got married this past winter and I surfed those sites for inspiration for my MOG (mother of groom) outfit I made for myself.
http://picasaweb.google.com/famwald/MOGDress#
HERE http://www.goingbridal.com/etc/index.shtml is another great place to browse some bizarre bridal stuff, with wonderfully snarky comments.
thanks everybody! I decided to postpone the stretchy project although I think it would be actually be easier than what I am trying now - a fitted strapless dress made out of brocade. and yes, ma, it will have boning! and I'm inventing the pattern! Talk about an engineering challenge :)
Post a Comment
<< Home